
Getting Started
With eZo successfully installed inside your HubSpot portal you are now ready to start setting up your store and begin styling the products you wish to sell.
This short guide will aim to give you a high-level overview of the key steps you need to take, however, please be advised that we will be creating more in-depth videos covering every aspect of eZo in the not too distant future...
Step 1 - Log In To Your HubSpot Portal
Once the Installation process is complete, please navigate to the Marketing/ Website/ Website Pages section of your HubSpot portal where you will see that seven new pages have been created during eZo's installation process:
- eZo Product Page
- eZo Product Listing
- eZo Shopping Cart
- eZo Closed Page
- eZo Success Page
- eZo Categories Page
- eZo Admin Portal
The eZo Admin Portal
The eZo Admin Portal is where it all happens and where you will go to set up products, view orders and basically do anything you need to do in terms of running your new eZo Store. It is therefore important that you spend some time getting to grips with the portal and learning how each element works.
All eZo pages will be unpublished when the installation process runs inside your HubSpot portal with the exception of the eZo Admin portal. This means that to enter the Portal all you have to do is VIEW the page and Enter the Password you set during the installation process.
We would advise that you enter the portal at the beginning and try to get everything set everything up first before you move on to publish any of the other pages.
Suggested Steps To Set Up Your eZo Portal
We would recommend that you take the following steps to set up your store:
1. Contact Details tab
Visit the Settings / Contact Details Tab and enter your Store’s Contact Details.
At first this may not seem important, however, having your contact details saved is essential as various functions such as Shipping and Notifications will not work without them. In fact, an eZo store cannot be opened without contact details being set.
2. Account Preferences tab
To set up your Account Preferences, please click on Settings/ Account/ Account Preferences.
Setting whether or not your store plans to sell Physical or Digital products is a fundamental choice inside eZo as it will make several important changes throughout your eZo Portal. We would therefore recommend that you set this value early and try not to change it to avoid the risk of something going wrong with your customers' orders. As a precaution eZo will automatically unpublish and live products when this change is made.
An example of this could be if you decide to move from selling Digital only products to Physical products. In this instance you could be selling products without any Shipping details set up in advance. Unpublishing products in this scenariou is therefore a good safety valve and will allow you time to review your products and make sure everything is set up properly before you publish your products again.
3. Financial/ Receipts
If you would like eZo to generate a receipt for each order simply enable it here and eZo will do the rest. You will then have the option to include receipts with customer notification emails or view them when you are fulfilling an order. You can also decide to email a copy of a receipt at a later date.
4. Financial/ Stripe
To connect your eZo portal with Stripe, please visit the settings/ Financial/ Stripe tab and use the links in this section to log into your Stripe account and authenticate eZo.
Please complete this step before you set up Products inside eZo!
- Clicking the 'Connect To Stripe' button will take you to the Stripe log in page where all you have to do is log in to Stripe using your Stripe credentials. This will authenticate eZo with your Stripe account and ensure that any future sales are credited to your account.
- Please note, if you don’t currently have a Stripe account and you click on the 'Connect to Stripe' button, simply enter the email account you would like to use to set up your Stripe account and follow Stripe's Set Up process.
- Having authenticated your Stripe account with eZo you can now continue to set up your eZo store.
Live Mode & Test Mode
- You may have noticed by this stage that eZo actually gives you two options to authenticate with Stripe - Live Mode & Test Mode. You can find more on how these options work in our Resource, 'Test Mode Explained', however, for now all you need to be aware of is that because Stripe allow you to run your Stripe account in both Live and Test modes eZo can therefore be authenticated with both sides of Stripe and you can run test purchases in eZo and not be charged.
- To set this up all you need to do is click on the 'Connect to Stripe' button for both the Live and Test Mode and simply log in with your log in credentials on each side. This allows us to authenticate with Stripe's Live and Test API keys and we can run test payments through the test side of your Stripe account.
5. Order Preferences
- Navigate to Settings/ Orders/ Order Preferences to complete your order preferences.
- If you have an eZo Premium account you will see two additional options on this page:
- • Order Stage & Order Status
Order Stage & Order Status allow an eZo Premium customer to decide if they would like to track both Order Stage & Order Status or simply use Order Stage only. - • Partial or Complete Shipments
Choosing "Partial or Complete Shipments' allows both Partial & Complete Shipments to be made when fulfilling an order. For example, if an item in an order is out of stock but you still want to despatch the order to keep the customer happy, this option will allow you to do this and then when the item comes back into stock and you can ship the remaining items. - • Limited Availability Options
Turn this option on if you would like an Alert to be displayed in your shop if stock levels fall below the 'Low Stock Indicator' level for a product (this is set for each individual product in the product section). - • Out of Stock
eZo provides various options when an item of stock. These include:
- Remove Out of Stock items from the store
- Show an Alert that the item is out of stock and remove the buy button
- Show an Alert but still allow customers to go ahead and purchase the item
- Remove the buy button and provide no alert
- Do nothing and allow purchases as normal
Whilst it may appear counter-intuitive to allow customers to buy items that are out of stock, there may be times when you are waiting on a delivery within a matter of days and therefore would like the ability to continue selling your products.
Please note, for obvious reasons these options are not applicable when selling Digital Products. - • Pricing Options
These options provide additional flexibility in terms of the logic relating to when customers can purchase from your store. Instead of closing your entire store and sending people to a 'We Are Closed' message you may instead decide to simply remove the pricing from the product page. This will remove the Buy Button and customers can see the product but not actually add it to their cart.
You can also decide to apply this logic if an item becomes out of stock.
6. Order Notifications
- Please visit Settings/ Orders/ Order Notifications to set up the various Notification Emails to be sent to your customers.
- eZo provides default text for all of the emails in your eZo portal, however, you can use this section to amend the emails to suit your own preference and use specific Short Codes to automatically pull in various information such as Order Details.
8. Shipping
- Complete your Shipping Set Up with the Shipping Zones, Shipping Options and Delivery Options
- This will generate a Shipping Rates table for you to complete
9. Products
- Click on the Products Tab on the left hand side bar
- Select “Add Products” and fill in all the required information in order to set up your product.
Launching Your Store
Having completed each of these options and styled your shop pages as you would like them to appear on your website, you can now:
- Publish the eZo Product Page
- Publish the eZo Product Listing Page
- Publish the eZo Shopping Cart
- Publish the eZo Success Page
- Publish the eZo Closed Page
- Publish the eZo Category Page
The last step left to complete is to Open Your Store by visiting the Settings section inside the eZo Admin Portal.
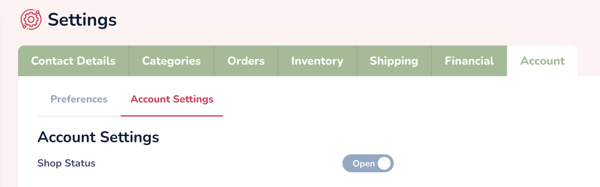
Once you toggle this switch, eZo will make a few essential checks such as you have at least one product published in your store, you have at least one Shipping Zone set up (if you are physical store) and your portal is connected to Stripe. Assuming all the checks are OK your products will now appear online on your new eZo store.
Enjoy eZo & Happy Sales!